Information about the time each employee arrives and leaves work is recorded in the attendance log. This allows. Timesheets with examples General note about the significance of identified anomalies
The timesheet in 1C ZUP 8.3 is kept for those employees whose wages depend on the amount of time worked (temporary workers).
There are two ways to record time worked:
- Accounting for deviations from planned time. In this case, all absences from work (time off, vacation, sick leave, etc.) are recorded. This accounting method also reflects unplanned work (overtime).
- This method reflects not only unplanned work and absences, but also time worked according to the schedule - continuous registration.
If you are wondering where to find the time sheet in 1C Accounting 8.3, I won’t bother you - it’s not there. For the purposes of extended accounting for salary, the 1C ZUP 8.3 solution is specially purchased. We'll talk about her.
The first thing you need to do is for the current year (for the year the timesheet is kept). From the Setup menu, select Production Calendars.
If the calendar has not been previously created, it must be created and filled out automatically, checking for correctness and making changes if necessary.

Opening hours
After filling out the production calendar in 1C ZUP, you need to create and fill out employee work schedules. To do this, go to the “Settings” menu and select “Employee work schedules”. 
The schedule can be filled out automatically and adjusted if necessary.

Work schedules can be set for employees using documents such as “Hiring” and “Personnel Transfer”.
ZUP has the ability to massively change the work schedule of employees.
In such situations, when an employee’s working conditions have changed for a certain period of time (for example, a shortened day), individual schedules are indicated for them. Setting up individual schedules is located in the “Salary” menu. If an employee has an individual schedule for a certain period, the program will not take into account the main one.
Filling out a time sheet in 1C ZUP
The timesheet in 1C ZUP 8.3 is located in the “Salary” section, item “Timesheets”. The timesheet uses the designations that are found in the “Types of Use of Working Time” directory. If it is necessary to indicate several types of time, each of them is indicated on a separate line.
The timesheet can be filled out automatically, adjusting the data if necessary. Some enterprises use ACS (access control and management systems). The whole point is that all inputs and outputs are recorded using an electronic access system. This data can be uploaded to a timesheet, eliminating the need to maintain it manually.

In order to be able to change the data in the timesheet regarding the work schedule, in the program settings you need to uncheck the “Check that actual time matches the planned one.” Otherwise, if the timesheet indicates working hours, for example, on a day off according to the work schedule, the document will not be posted.
It should be remembered that when maintaining both timesheets and reflection documents at the same time, the timesheet will have the highest priority when receiving time worked for payroll calculation.
Form T-13
In 1C ZUP 3.1, there is a printed form “T-13” for viewing time worked. You can generate this report from the “Salary” section by selecting “Salary reports”. The report you need will be called “Time Sheet T-13”.

- Take into account the actual time worked by the employee.
- Monitor the employee’s presence at the workplace.
- Calculate wages.
The attendance log is a table in which the rows contain a list of employees, and the columns contain calendar dates. The table cells contain employee attendance in the format selected in the Type field:
- Opening hours, for example, 16:00 – 22:00.
- Duration, for example, 6:00.
To generate a log:

To find an employee or shift in the list, enter a word or several characters in the field Search.
From the attendance log you can see what schedule the employee was supposed to work on on the day when this attendance was recorded. To do this, select attendance and the context menu item Schedule. Information about an employee coming to work can be deleted (context menu item Delete).
The following notations are used in the cells of the attendance log:
| Designation | What does it mean |
|---|---|
| Log type Opening hours. Employee arrival and departure times recorded in iikoFront. The font color is set in the turnout type; by default, all turnouts have the type Processed - their boundaries are shown in black font | |
| Log type Duration. Duration of attendance. | |
|
|
For open shifts, the start time is indicated, and instead of the end time, “not closed”. |
|
|
Attendance of the selected employee on the current date. |
|
|
Attendances of the selected employee for future dates (for example, sick leave or vacations) |
|
|
An employee's absence from work due to vacation, sick leave or absenteeism is indicated by short names specified when setting up these types of attendance (for example, “O”, “B” or “P”). |
| An attendance whose approved arrival/departure time differs from the actual time registered in iikoFront. | |
| Appearance lasting more than 24 hours. | |
| An appearance lasting less than 24 hours, intersecting with another appearance. | |
| The employee's attendance is not registered in the department in which his salary is paid. | |
| The appearance has been copied to the clipboard. |
If the turnout duration is less than a day, but its boundaries are fixed by different dates, then it is displayed in the opening date cell. For example, the shift was opened at 20:00 on October 5, and closed at 04:00 on October 6. In this case, the entire turnout is displayed in the October 5 column.
If the duration of attendance is more than 24 hours, then it is displayed in several cells before the closing date of the shift.
Long turnouts are closed automatically after the number of days specified in the merchant settings on the tab Time tracking in field Automatically close the appearance after n days. The comment to the appearance indicates the reason for automatic closure. In iikoFront this turnout is considered open. And when an employee finishes such a long shift, this time of departure is no longer taken into account.
Detailed information about opening and closing a shift, automatically closing and ignoring attendance is contained in the Event Log.
Registration of appearances
There are several options for registering appearances:
- Automatically in iikoFront: at the moment of opening and closing an employee’s personal shift,
- Automatically in iikoOffice: when assigning non-working shifts – sick leave, vacations. To use this feature, you must complete preliminary settings, see Schedule Log.
- Manually from iikoOffice: for example, to approve attendance for salaried employees or edit automatic attendance.
The fact of an employee’s presence at the workplace can also be registered from his personal report (button Actions → Add attendance).
To register attendance manually:

Thus, using manual registration of attendance, a manager (or other responsible person) can offset, reduce, increase or not offset the overtime recorded in iikoFront, as well as redefine the employee’s attendance type based on the fact.
If appearances are often repeated, then to speed up the process, the required appearance can be copied. Copy and paste commands are available from the context menu and by pressing keys Ctrl+C, Ctrl+V. The attendance copied to the clipboard is highlighted in yellow in the table.
Employees are paid only for confirmed attendance. They can be counted in two ways: automatically or manually by the manager. This depends on the settings for closing the cash register shift.
If the attendance is confirmed automatically, then its arrival and departure times coincide with the actual ones registered in iikoFront.
If manual confirmation is configured, then the accepted time of arrival and departure of the employee is indicated by the manager when closing a cash register shift or in iikoOffice. To manually accept attendance at the terminal, see the article Employee Attendances.
To accept an appearance in iikoChain:
- Select menu item Employees → Attendance log.
- Open the appearance to be accepted.
- Specify your departure time. Check mark Confirm manually is installed by default.
- Click the button Save.
During work, it may happen that employees open several shifts at different terminals, or a manager creates attendance manually in iikoOffice or iikoChain. As a result, several intersecting appearances are formed in the journal, which are combined into one. The result of the merger depends on how appearances are confirmed: automatically or manually.
At automatic confirmation overlapping confirmed attendances registered in the same department for the same employee position are combined. As a result of the merger, the last manually confirmed attendance remains, for which the checkbox is checked Confirm manually. If one is not found, then the earliest turnout among the intersecting ones is selected, the rest are deleted. The remaining turnout:
- Confirmed arrival and departure dates do not change.
For example:
- Overlapping turnouts created in iikoFront.
- A turnout has been created and closed at Terminal 1 from 12.00 to 14.00.
- A turnout has been created and closed at Terminal 2 from 13.00 to 13.30.
- Two turnouts created in iikoFront overlap with the manual turnout.
- In iikoOffice, attendance was manually created from 12.00 to 18.00.
- A turnout has been created and closed at Terminal 1 from 16.00 to 16.30.
- A turnout has been created and closed at Terminal 2 from 16.00 to 17.00.
At the end of a shift at Terminal 1, attendance will be automatically combined. Confirmed times are from 12:00 to 14:00.
As a result, only the first appearance will remain, the rest will be deleted. The counted time is from 12.00 to 18.00.
In manual confirmation mode, only overlapping closed unconfirmed attendances registered in the same department for the same employee position are combined. As a result, for such a combined turnout:
- A registered interval in iikoFront is a union of similar intervals of overlapping turnouts.
- The confirmed interval is the confluence of all confirmed intervals of overlapping turnouts.
For example:
- Overlapping confirmed
- A turnout has been created and closed at Terminal 1 from 14.00 to 14.30.
- A turnout has been created and closed at Terminal 2 from 14.10 to 14.20.
- Overlapping selectively confirmed
- The turnout opened at Terminal 1 at 2 p.m.
- Terminal 2 opened, closed and confirmed attendance from 14.10 to 14.20.
- The turnout at Terminal 1 closed at 14.30.
- Intersecting with manual
- iikoOffice has created a turnout from 12.00 to 18.00
- Terminal 1 opened, closed and confirmed attendance from 14.00 to 16.00.
At closing, the second turnout merges with the first. The limits for confirming the combined turnout are from 14.00 to 14.30.
As a result, the turnouts will not be combined, because The appearance at Terminal 2 has already been confirmed.
As a result, the turnouts will not be combined, because at the time the second appearance was confirmed, the first one had already been accepted.
All cases of merging appearances are reflected in the Event Log with the “Merger of several appearances” type.
To upload the Attendance Log to MS Excel from the menu Actions select item Export to Excel. The log is uploaded taking into account user grouping, filtering and configured parameters: “period”, “show all employees”, “View: Period/Interval”. In Excel format, the report is generated in the same form as you see it in iikoOffice.
Time sheet
The time sheet contains information about the hours worked by employees. The columns of the timesheet indicate attendance codes and the number of hours worked for each date of the reporting period. For no-shows, only their codes are entered, and the unworked time is not indicated (the corresponding columns remain empty).
If an employee works according to a schedule or on a salary, then the time sheet includes only the time that he worked in accordance with the schedule.
If an employee has a flexible schedule, then the timesheet includes all his hours worked without taking into account the schedule.
To print or download the “Working Time Sheet according to Form No. T-13” into Excel, click the button Actions and select Printing form T-13 or Uploading form T-13 into Excel.
Dear Colleague, good afternoon!
We inform you that today - June 23 (Thursday) at 13:00 Moscow time there will be a second live broadcast on ZUP 3.0 (3.1)!
Today Elena Gryanina will give live answers to questions that were asked during the seminar
We are confident that this collection will not leave indifferent any user of ZUP 3.0
1. When printing the “Acceptance Order (T-1)”, the prefix does not appear in the document number. Is it possible to customize the output of the prefix in a printed form?
Yes, in ZUP 3.0, the output of the prefix in a printed form can be configured. To do this, you need to open “Additional settings” (menu section “Settings”) and uncheck the “Remove organization and information security prefixes from personnel order numbers” checkbox. In the same window there are other settings for printed forms, as well as settings for organizing employees in list documents.

2. Please tell me where in ZUP 3.0 I can see a detailed report on employee vacations and the balance of vacations? (In ZUP 2.5 there was a “Vacation Certificate” where it was visible for what periods and when the vacation was used, as well as the current balance).
In ZUP 3.0, more standard reports have appeared for tracking both the releases themselves and balances. In the employee card (the “Employees” directory), on the “Absences” tab, you can call up the printed form “Certificate on employee leaves.” This is an analogue of the report that was in ZUP 2.5.
But besides this, a number of reports appeared in 3.0: “Vacation balances”, “Vacation balances (briefly)”, “Actual vacations”. These reports can be found in the menu section “Personnel” - “Personnel Reports”.

3. Please tell me whether it is possible in ZUP 8.3 to set up a summary of the accrual and deduction of salary for a quarter, half a year, etc. It generates only for a month or, if you set a period, it is divided into months.
Yes, you can. You need to slightly customize the “Full summary of accruals, deductions and payments” report. To do this, you need to open the report, go to its settings (the “Settings” button), go to the “Advanced” view and on the “Structure” tab remove the grouping by “Accrual month”. To do this, you should open the line “Accrual month, organization” for editing and in the window that opens, uncheck the “Accrual month”. Close and generate the report. You can save this version of the report so that you do not have to make this adjustment each time.

4. During the first synchronization, will all data for all years be uploaded from the ZUP to the BP? Or is it possible to somehow set up an upload restriction so that data for those years that are already in the Accounting program are not uploaded (previously I entered them manually)?
This possibility exists. At the stage of setting up synchronization, the step “Configuring data synchronization parameters” will be performed. At this step, you will see a link “Edit upload rules” at the bottom of the window. Click on it and a window will open in which you need to indicate the “Start date for using the exchange.” All documents with a date less than the date specified here will not be uploaded. This date must be configured twice, both for the rules for sending to Accounting and for the rules for sending to ZUP.

5. When calculating insurance premiums for pests, one-time charges are ignored. Can you tell me where this database is configured?
When posting the “One-time accrual” document, information about income is recorded in the “Income accounting for calculating insurance premiums” register. If, when checking out the document, the program sees that this employee works in a staff position that provides for harmful/difficult working conditions, then the column “Subject to contributions for those employed in jobs with early retirement” will be filled in the register.
Most likely, this item in your register is not filled in, so when calculating contributions in the document “Calculation of salaries and contributions”, the one-time accrual is not taken into account. This could happen for the following reason: You first made a one-time accrual, and only then configured the staff unit to provide for harmful/difficult conditions.
To solve this problem, it is enough to re-perform the One-time accrual and then recalculate the contributions.

6. Is it possible in ZUP 3.0 to print order T-6 for maternity leave? I did not find such a form in the Sick Leave document.
Indeed, by default in the “Sick Leave” document, which reflects Maternity Leave, there is no such printed form. For it to appear, you need to configure the program. Go to the HR accounting settings (menu section “Settings” – “HR accounting”) and check the “T-6 for maternity leave” checkbox. After this, the printed form in the document will become available, and also after this Maternity Leave will be included in the T-2 employee’s Personal Card.

7. In ZUP 3.0, in the Production calendar, I clicked on the Fill in default button. As a result, all the holidays were cancelled. Only Saturdays and Sundays are reflected as non-working days. How can I return the originally filled calendar? Can this be done automatically without having to fill it in manually again?
Yes, of course you can. Most likely, when you clicked the “Fill in by default” button, you did not have the Code field filled in. You need to indicate “RF” in this field and the program will fill in all holidays, transfers and pre-holiday days in accordance with the law.

8. In the organization’s settings, I indicated the method of paying salaries “By crediting a card” and indicated “Salary project”. Entered employee personal accounts. But when generating the Statement, the personal accounts of employees are not filled out to the bank.
Most likely, in the document “Statement to the Bank” you did not indicate the “Salary Project” within the framework of which the statement is being generated. The fact is that ZUP 3.0 can keep records within several Salary projects at once and therefore it is necessary to clearly indicate which specific payment is being made.

9. Please tell me how to withhold unspent amounts on the advance report from an employee’s salary in 1C ZUP 8 3.0?
For this purpose, ZUP 3.0 provides a special standard Type of operation, which is indicated for the Deduction type. You need to do the following: create a new Type of deduction (section “Settings” - “Deductions”), in it select the Purpose of deduction “Deduction for settlements of other transactions” and Type of operation “Retention of unspent accountable amounts”, indicate that the result is entered as a Fixed amount .
Next, we create the document “Deduction for other operations” (section “Salary” - “”), indicate the created type of deduction and the period of 1 month. We carry it out. The deduction itself will occur automatically in the document “Calculation of salaries and contributions.” After this, whenever we need to perform such a deduction, we must enter the document “Deduction for other transactions” with this type of deduction.
10. During synchronization, neither the Salary Reflection Sheet document is transferred. Only reference books were transferred. Why?
Check the “Start date for using the exchange” in the data synchronization settings: menu section “Administration” – “Data synchronization settings” – “Data synchronization” – “Configure” button. Most likely this date is greater than the date of the documents you are trying to transfer. Edit it. Just keep in mind that the date adjustment must be made in the synchronization settings both on the ZUP side and on the Accounting side.

11. I create and calculate the “Vacation” document, but when I try to post it, the document is not posted. The message “document not calculated” appears. Why?
Before posting a document, you must check the “Calculation approved” checkbox at the bottom of the document form, or use the “Approve” button in the general list of documents. This need arises if the database contains users with personnel rights. They also have access to the personnel part of the Vacation, Business Trip, Sick Leave and some others documents. It is these users who initially create these documents, indicating the period and other personnel settings, and the user with the rights of the accountant must check the calculation of the document (it is not visible to the personnel officer) and Approve this document.

12. I tried to use the document “Planned accrual assignment”, but when selecting an accrual, the types of calculations are not visible. When using the document “Change of planned accruals” everything worked out. What then is the first document in ZUP 3.0 for?
“Planned accrual assignment” is a fairly new document in ZUP 3.0. It is used to assign types of accruals that have the attribute “Supports several simultaneous accruals.” This feature means that one type of accrual can be assigned to one employee several times, with different input calculation conditions. And this accrual will appear for the employee in several lines with different amounts in the “Accrual of salaries and contributions” document.
For example, an employee was “assigned a mentee,” a new employee, for 3 months and was assigned a “Mentoring Bonus” of 10% for a period of 3 months. The next month they assigned another one for a period of 6 months and again assigned the same bonus (the same type of accrual), but for a different period and not 10%, but 7%. The type of accruals will be the same, but the lines in the document “Salary accrual ...” will be different, with different amounts. It is for such situations that you need to use this document.

13. When setting up synchronization between ZUP 3.0 and Accounting 3.0, you can specify that the upload is performed “consolidated by employee”. In Accounting, there is a similar setting in Accounting Options. What is the difference?
If in the synchronization settings we select the “Summary by employees” option, then the Statements will not be uploaded to Accounting at all, and the “Salary Reflection...” document, although uploaded, will not contain information about employees even in the tabular section.
If in the synchronization settings we select the option “With detailing ...”, and in the Accounting Parameters on the Accounting side we indicate “Summary ...” (menu section “Administration” - “Accounting Parameters” - “setting up a chart of accounts” - “Accounting for settlements with personnel” ), then the Statements will be unloaded from the salary, and the document “Reflection of salaries...” will contain information about employees in the tabular section. But when posting such a document, the postings will be made consolidated, precisely due to the settings in the Accounting Options of the accounting program.
That is, the setting in synchronization determines what is uploaded, and the setting in Accounting Parameters determines how postings are made in the “reflection of salaries in accounting” document.

14. How can I configure the accrual type in ZUP 3.0 to reflect additional supply from the Chernobyl nuclear power plant?
It is enough in the salary calculation settings to check the box “Additional leaves for citizens exposed to radiation as a result of the disaster at the Chernobyl nuclear power plant” (menu section “Settings” - “Payroll calculation” - “Setting up the composition of accruals and deductions” - “Vacations” tab). After this, the corresponding accrual type and vacation type will be created in the program. The vacation itself must be reflected in the “vacation” document. On the “Additional leave, time off” tab, indicate the type of leave “Additional leave for victims of the Chernobyl nuclear power plant” and the period. After this, on the “Accrued” tab, the program will independently calculate the type of accrual (it will only calculate days, since the vacation itself is paid from the Federal budget)

15. How to remove dismissed employees from the list in ZUP 3.0?
To do this, you need to open the employee’s card (open the desired element of the “Employees” directory for editing) and at the bottom of this form check the “Do not display in lists” checkbox. All transactions regarding the employee have been completed." As a result, this employee will not be visible in the directory list. If you need to view it, then at the bottom of the “Employees” directory itself, you need to uncheck the “Hide employees for whom operations are no longer performed”

16. How can I enter information about earnings from my previous place of work in ZUP 3.0 to calculate sick leave?
To enter this information into ZUP 3.0, you should use the document “Certificate for calculating benefits (incoming).” It can be called up from the Salary menu section - see also - Certificates for calculating benefits or directly from the calculator for calculating average earnings in the “Sick leave” document (button “Add a certificate from a previous place of work”). The main thing is that after entering this information in the Sick Leave document, check the box “Take into account the earnings of previous policyholders” (the “Payment” tab), otherwise it will not be taken into account in the calculation.

17. The percentage of sick pay in the ZUP for an Employee is minimal 60%, although the length of service is long and should be 100%. I entered information about my work experience, but the sick leave program does not take it into account. Why?
It is likely that the reference date from which you entered the length of service is greater than the start date of the sick leave. That is, it turns out that at the start date there is no hospital experience in the program. Therefore, you should correct the date from which information about the experience is entered. This can be done directly from the “Sick Leave” document.

18. Is it possible to somehow track all current planned employee accruals in ZUP 3.0?
Yes you can. Firstly, you can view all planned accruals and deductions that are valid as of the current date in the employee’s card (the “Employees” directory) on the “Accruals and Deductions” tab. Secondly, after opening this tab, a window will appear and the “History” button will be available in its upper right corner. This button opens a report that will tell you about the entire history of changes in planned accruals for this employee.

19. How to make ZUP 3.0 so that HR officers cannot change documents in the already calculated period?
Yes, a ban date must be set. This is done in the Administration – Support and Maintenance section. Check the “Change prohibition dates” checkbox and click on the “Settings” link to the right of the checkbox to open the settings window. There we indicate which users, from what date, to which sections and/or objects to deny access. To perform this setting, you must have the appropriate rights.

20. I would like ZUP 3.0 to include the ability to prepare a layout of pension files.
There is already such an opportunity in 1C ZUP 3.0! In the list of regulated reports (menu section Reporting, references - 1C-Reporting) you can create such a layout. A form will open in which you need to select an employee (fill in all available and necessary information on the employee) and enter files with scans of the necessary documents. After this, you can send the Layout directly from 1C to the Pension Fund of Russia (if you have 1C-Reporting connected).

21. How can I print out an employee’s income certificate from the ZUP?
ZUP 3.0 has different forms that can help you with this. Firstly, as part of the list of the Employees directory there is a printed form “Certificate of Income (free form)”. Secondly, there is a document “Outgoing certificate for calculating benefits”, from which you can also print information about income. This document can be created based on the Dismissal document; it can also be found in the Main Menu – All Functions. Quite often, to provide information about income, they use the 2-NDFL form from the document “2-NDFL for an employee” (menu section “Taxes and Contributions”).

22. Every time you open a document that contains a list of employees, the sorting by employee names gets lost. How to set it up correctly so that it doesn’t go astray?
Yes, this sorting can be customized. To do this, you need to move the sorting option by Employee Name to the very top in the Additional program settings (menu section Settings – Additional settings). The fact is that by default the program is configured to sort first by Division, then by Position and only then by Name. It’s just that this order needs to be changed and all tabular parts of the list documents in ZUP 3.0 will be sorted by employees’ full names.

23. An employee combines the work of someone who has gone on vacation. It is necessary that the part-time employee receive both his own salary and the salary of that employee, and that the calculation takes place according to different schedules. How to implement this in ZUP 3.0?
In ZUP 3.0 it is better to implement this by entering “Part-time jobs” (this is a fairly new program mechanism). In the document “Assignment of part-time work” you need to enter information about who works for whom and the schedule of the person being replaced. Also enter the deadline and check the terms of payment for this Part-time Job. As a result, in the document “Calculation of salaries and contributions” for the replacing employee, both his Salary (according to the schedule that he has) and the calculation of the Salary of the replaced employee (according to the schedule of the replaced one) will be calculated. In order for this mechanism to be available in the HR Accounting Settings (menu section Settings – HR Accounting), you must check the “Part-time jobs are used” checkbox.

24. Where in the program do you need to fill in the information so that the information on the representative’s document is filled out on the title page of the 6-NDFL?
This information in ZUP 3.0 is filled in in the information about the organization. On the “Main” tab, you need to click on the “Change registration data” link and in the “reporting signs” settings group that opens, select the Representative and fill in the necessary information about the representative.
Just keep in mind that this information goes on the title page of the 6-NDFL/2-NDFL report when creating the report, and not when filling it out. Therefore, if you have already created and saved a report, then you need to create a new report.

25. Is it possible in ZUP 3.0 to formalize loan obligations? Or do I need to create the hold manually?
Yes, of course there is. For this purpose, ZUP 3.0 provides a group of documents in the “Loans to Employees” journal (menu section Salaries - See also). These documents contain information about the terms of the loan, changes in conditions, issuance and repayment of the loan. If the terms of the loan provide for repayment from salary, then in the “Payroll calculation...” document the deduction will be automatically made. Personal income tax will also be calculated on material benefits, if this is indicated in the conditions.

26. The T-3 staffing table is generated only for the current date; it is not possible to select the date for generating the report.
Most likely you are generating a T-3 report from the Staffing Directory. The developers provided that it forms the current staffing table. If you need to generate T-3 for some other date, then it is better to call the report from the list of Personnel reports (menu section Personnel – Personnel reports – Staffing list (T-3) report). In this version of the report, the default date is displayed in the report header.

27. Why is the additional payment for night work not calculated? The line in the Payroll document appears.
It is worth checking in the Payroll document what the value of the “Hour” indicator is. We’re standing.” It is used in the standard formula for calculating this Surcharge. Most likely “Hour. We’re standing.” turned out to be zero. This could happen for the following reason: in the Payroll Settings (menu section Settings - Payroll), the method for recalculating the employee’s monthly salary to the hourly rate is set according to the “Average monthly number of hours (days) in a month”, but the “Average monthly number” is not filled in the employee’s schedule hours". You must ensure that it is filled out or enter it manually.

28. The employee periodically works in conditions with difficult working conditions, but remains in the same position. Is it possible to reflect this in ZUP 3.0 without transferring to a new position?
Yes, in ZUP 3.0 this can be reflected using standard means. In the settings of the organization's Accounting Policy (in the "Organizations" directory on the "Accounting Policy and Other Settings" tab), you must check the "Use special working conditions" checkbox. After this, in the “Working Conditions” reference book, you need to create a new element and set working conditions. The fact that an employee works under these Working Conditions can be reflected in the “Ticket Sheet” document. As a result, there will be no need to transfer to another position; now working conditions are set not only through the Position.

29. I can’t find a document for maternity leave!
In ZUP 3.0, you should use the “Sick Leave” document for this. In the document, in the “Cause of disability” field, you must select the option “(05) Maternity leave.”

30. There is one ZUP 3.0 database with two organizations and two separate ACC 3.0 databases with the same organizations. How should I set up synchronization in this case?
You need to set up two different synchronizations. If we consider the setup from the Salary database, the situation is as follows. In the first synchronization there will be a path to the accounting database “A” and only organization “a” is selected for synchronization. In the second, the path to base “B” and, accordingly, the exchange is carried out through organization “b”. The path to the database, as well as the selection of the Organization through which the exchange takes place, occurs at the time of setting up synchronization.

31. The employee's pay slip now has lines for the previous months, why did this happen?
The fact is that ZUP 3.0 implements a mechanism for tracking the need for recalculation. Most likely, after you completed the “Payroll calculation...” document last month, some change was made to the conditions for calculating wages as of the date of the previous already calculated month (for example, a personnel transfer was made). The program tracked this and recorded the need for recalculation for this employee/employees. You can track all current registered recalculations in the menu section Salary – Service – Recalculations. There you can manually delete or, on the contrary, add the need for recalculation.
In your case, you should analyze the situation, find out why the recalculation was registered and understand whether it is correct or not. Maybe it's just an accounting error.

32. I made the initial transfer of data from ZUP 2.5 to 3.0, I am generating reports on employee salaries, but they are empty. Why didn't anything transfer? There were no transfer errors.
Most likely, when transferring data, you used the recommended, shortened transfer option (it is set by default). Its peculiarity is that ZUP 3.0 contains only the most necessary information - data for calculating average earnings, information on calculated taxes and contributions, initial personnel information. You will not be able to see the data for calculating the average through salary reports; it will be used directly when calculating Sick Leave, Vacations, etc. You can also check the transferred information directly in the “Data Transfer” document log (menu section Administration – See also). And you can check the initial personnel information in the “Data for the beginning of operation” journal (menu section “Main”).

33. What does the mechanism of Synchronization of ZUP 3.0 and Accounting 3.0 imply: what information is transferred?
There are two main documents that participate in the synchronization process, these are “Reflection of salaries in accounting” (in accounting, salary postings are created on its basis) and the document “Statement...” (in the Accounting program they are attached to expense documents). The transfer of “Vedomosti...” can be disabled. A number of other documents may also be involved in synchronization: “Accrual of estimated liabilities for vacations” (if liabilities are kept track of), Depositing wages, Payment of deposited wages, Issuing a loan to an employee, Repaying a loan by an employee.
Directories that are used in documents are also synchronized: Organizations, Individuals, Reflection methods.
The full list of data registered for synchronization can be tracked here: Administration – Data synchronization settings – Data synchronization – Configure – Data synchronization parameters – Composition of sent data.

34. How to set the reflection method for holding (ZUP 3.0)?
For the Retention Type, the reflection method is not specified. The main thing in the settings for the type of deduction is to correctly select “Destination of deduction” and, if required, “Type of operation...”. Based on this data, when transferred to the Accounting program, the necessary posting will be automatically entered.

35. I want to put things in order with the calculated, withheld and transferred personal income tax. To analyze the situation, which reports and registers should I look at?
Firstly, you can use the reports provided by the developers: Analysis of personal income tax by month and Analysis of personal income tax payment (menu section Taxes and contributions - Reports on taxes and contributions). Well, secondly, you can directly analyze the registers that contain information about calculated, withheld and transferred personal income tax. Enumerated- this is the incoming movement of the register “Calculations of taxpayers with the budget for personal income tax”. Held– expenditure movement according to the same register and income movement according to the register “Calculations of tax agents with the budget for personal income tax”. Listed– expenses according to the register “Calculations of tax agents with the budget for personal income tax”.
It is most convenient to analyze using a Universal report (Main menu – All functions – Reports).

36. Where to enter information about advance payments for patents?
This information is entered in the employee’s card (the “Employee” directory). You need to go to the “Income Tax” tab and at the bottom of the window you will have the opportunity to enter a “Notification for advance payments on patents”. Here you must also indicate the employee’s status “Non-resident employed on the basis of a patent.”
You also need to enter information about the advance payment itself. This is done by the document “Advance payment for personal income tax” (section Taxes and contributions - All documents for personal income tax)

37. All accruals have been made, but for some reason the employees are not included in the Cash Register. What could be the reason?
The salary payment option may be incorrectly specified in the settings. Check in the organization settings (tab “Accounting policies and other settings” - “Accounting and salary payment”) or in the department settings which payment method is selected. If the correct option there is through the cash register, then check what is indicated on the employee’s card (tab “Payments, cost accounting”)

38. All accruals have been made, but for some reason the employees are not included in the cash register. What could be the reason?
If you mean the “Payable” column, this means that the employee has a debt for the previous accrual months. For example, this situation regularly arises among those who use rounding when paying salaries.
If we are talking about the personal income tax field for transfer, this means that at the time of salary payment there is personal income tax, which was calculated last month, but for some reason was not withheld. It is better to analyze this situation. Find out why personal income tax was not withheld. In principle, this is not always an error. It is possible that the employee simply was not paid and therefore it was not possible to withhold personal income tax. But in any case, the situation should be clear to you.

39. Which document in ZUP 3.0 reflects the rental of a car from an individual?
To do this, it is better to use the document “registration of other income” (menu section “Salary” - See also - document journal “Other income”). In order for this document to be available in the Payroll Settings, you must check the box “Other income not related to wages is registered” (menu section “Settings” - Payroll).

40. You need to calculate your salary, but the employee has not yet brought in sick leave. How to reflect his absences?
You should use the document “Absenteeism, no-show” with the type of absence “Absence for an unknown reason” (menu section Personnel - All absences of employees). This document will displace the employee’s working days from the schedule when calculating wages. After sick leave is granted next month, simply enter the Sick Leave document, which will automatically cancel the information for this Absence for an unknown reason.
In order for the document “Absenteeism, no-show” to be available, you need to check the appropriate box in the program settings (section Settings – Payroll calculation – Setting up the composition of accruals and deductions – Absence accounting tab).

41. The Timesheet document is not posted. A message appears: The time type Weekends does not match the planned data Attendance.
In this case, the program checks the compliance of the entered Timesheet and the days off specified in the employee’s Schedule. To prevent this from happening, you need to uncheck the “Check whether actual time matches the planned time” checkbox in the payroll settings (menu section Settings – Payroll).

42. For some reason, I can’t select Additional leave for irregular working hours in the Hiring Application. Although it is in the list of types of vacations.
Most likely, when creating this Type of leave, the “Vacation is annual” checkbox was not selected. Set it and this additional leave will be available when selecting annual leave in the Hiring document.

43. Please tell me why there are no buttons for selecting options for the Simple-Advanced view in the report settings? What can I do to make them appear?
Try resetting the appearance settings for the current user. This is done in the menu section Administration – User and rights settings – User settings.

44. I can’t understand how to choose a separate division when forming 6-NDFL?
To do this, you need to double-click on the “submitted to the tax authority (code)” field on the title page of the report. As a result, a window will open. In it, you should select the tax authority corresponding to the Separate Division for which the report is being prepared.

45. ZUP 3.0. Setting up a new type of accrual. We enter a new indicator and there you need to indicate whether it is numerical or monetary. Tell me what to choose?
If through this indicator you will enter some monetary value (for example, the seller’s revenue) or a ready amount for calculation, then it is more logical to indicate the “Money” option, but if this is an indicator of a certain quantity (for example, the number of watermelons sold) and Based on this amount, the accrual will be calculated, it is better to enter it as a Numeric. Although globally this setting does not affect anything yet, since you determine for yourself what is meant by this or that indicator that you create - pieces, liters, kilograms, kilometers or something else.

46. Please tell me how to properly set up accounting for separate divisions for submitting personal income tax reports?
It is necessary to select the “This is a separate division” checkbox in the “Divisions” directory elements that correspond to these separate divisions and, using the “Change” link, specify information about the tax authority to which this division belongs. As a result, the calculated, withheld and transferred personal income tax of employees registered to work in such separate divisions will be registered in the context of tax authorities. And when generating regulated reports, you will need to select a tax authority before generating them.

47. It is necessary that when choosing an employee it is clear whether he is an internal part-time worker or an employee at the main place. Can this be configured in ZUP 3.0?
Yes. To do this, in the HR accounting settings (menu section Settings - HR accounting), you need to set the Rules for the presentation of elements of the Employees directory. There are several options that involve displaying the “Type of employment”.

48. We start accounting in ZUP3 from scratch. We entered all the information about the employees. We wanted to pay an advance, but the advance payment form is not filled out
It is likely that in the document with which you entered the initial data for the employee (Hiring or Initial staffing), the option of paying the advance “By calculation for the first half of the month” is specified. It is necessary to enter, fill out and calculate the document “Accrual for the first half of the month” or change the option (indicate the Fixed advance amount or percentage). Then the Statement with the Advance payment option will be filled out automatically.

49. Please tell me how to divide personal income tax into main employees and contractual employees when reflecting salaries?
It is necessary to set a separate reflection method for “contractors”. This can be done in the document “Agreement (work, services)” in the field “Invoice, subconto” or in the document “Acceptance certificate for completed work”, if you use them.”

50. It is necessary to accrue vacation to the employee at his own expense. I can't find the document!
This document is called “Leave without pay”, it can be found in the document log “All absences of employees” (menu section “Personnel”). If this document is not there, then in the salary calculation settings you need to check the “Leaves without pay” checkbox (menu section Settings – Payroll – Setting up the composition of accruals and deductions – “Vacations” tab)
- Anomalies in the official statistics of the March elections are detailed in the last issue of TrV-Nauka. Candidate of Sciences discusses the methodological basis for their identification and the significance of these anomalies for assessing election results. biol. Sciences, Associate Professor of the Department of Sociology at the Higher School of Economics in St. Petersburg. For the online version of the article, three figures and explanations were added to them (see below).
In connection with the past elections, discussions about anomalies in electoral statistics have once again revived. Unlike 2011–2012, the main platform for discussion was not LiveJournal, but Facebook, but some topics turned out to be surprisingly tenacious. In particular, again many copies were broken during the epic confrontation between “Gauss” and “Churov”. It would seem that everything has been argued and resolved, but there are still those who believe that turnout should be distributed normally, and those who believe that all assessments regarding the falsification of election results are incorrect on the basis that turnout does not at all have to follow a normal distribution. distribution. Thanks to the persistence of the disputants, we will not reach an agreement for a long time, but some intermediate result can be drawn.
Why shouldn't the distribution of turnout be normal?
In addition to sociological considerations about the natural spatial segregation of the population, there are two purely mathematical reasons for this. First, the range of possible turnout values is rational numbers (that is, numbers that can be obtained by dividing whole numbers by each other) ranging from zero to one, while the normal distribution is continuous and infinite. Secondly, polling stations are not random samples from the general population of voters, and the distribution of average voter turnout rates across them cannot be considered a case reducible to the Central Limit Theorem.
The distribution of turnout would have a chance of approaching normality if the polling stations were formed by a lottery held among the entire population of the country (and the few hundred lucky people who drew, say, number 1768, no matter where they lived, would be considered assigned to the polling station with that number, exactly as well as those who pulled out the remaining numbers from 1 to more than 97 thousand). Things would go even better if voters could vote not entirely, but in parts, giving, for example, not 1, but any random amount of vote from 0 to 1 (for example, 0.967). However, both of these proposals are quite far from reality.
In addition to speculative considerations, there are comparative data for different countries. In none of them does the distribution of turnout across precincts pass standard tests of normality. Not every distribution with a bell-shaped density graph can be considered normal in the strict mathematical sense. What is required is not just a “bell”, but a “bell” of very specific proportions. The turnout histogram is usually more peaked than the density of a normal distribution with the same expectation and variance, and is somewhat asymmetrical.
What should it be like in Russia?
We don't know for sure. The existing distortions are quite significant. In some places the true distributions are not discernible at all (for example, the Chechen or Kabardino-Balkarian republics), in others only their traces are visible (Tatarstan, Kemerovo region). At the same time, we have certain theoretical considerations about how the distribution of turnout is formed. Voters make decisions about participation or non-participation in voting under the influence of many factors that modify even the most stable patterns of voting behavior.
As a result, each region is characterized by its own average indicators of voter activity with a certain spread of values across polling stations, partly due to random factors. In almost every major region, the distribution of turnout should be approximately bell-shaped, slightly asymmetrical (usually due to slightly higher turnout and greater spread of values in small "rural" areas than in larger "urban" areas), with low "shoulders"/" tails."
Regions may differ in turnout averages or dispersion rates, but these differences should form some reasonable geographic pattern: North vs. South, West vs. East, urban vs. rural. The presence of historical “internal” borders helps a lot (for example, parts of Poland that were previously part of the Russian Empire, Prussia and Austria, the former GDR and West Germany as part of a united Germany, North and South Italy or the USA). These patterns are relatively stable over time and cannot change sharply and in different directions from one electoral cycle to another.
Russia is large and diverse, but the natural heterogeneity of its population cannot explain the level of differences observed in the nature of turnout distributions in different regions (for example, almost zero variation in Kabardino-Balkaria, Ingushetia and Chechnya in some years against completely “human” indicators Sverdlovsk region, Karelia or Khakassia), nor geographical oddities - it is not clear why Tatarstan, the Krasnodar Territory and the Kemerovo region, which are distant from each other, show similar distribution patterns, between and next to which are located almost “ideal” regions in terms of electoral indicators like Sverdlovsk or Novosibirsk regions. The hypothesis of natural heterogeneity also does not explain the radical changes in the distribution of turnout in Moscow between the Duma elections in 2011 and the presidential elections in 2012.
Why can’t it coincide with the “Churov distribution”?
Because anomalies are not limited to asymmetry in the distribution of turnout. One of the most important features of the “Churov distribution” is its anomalous attraction to round numbers. Starting at about 80% of turnout (and in some years even lower), such outliers are located at every whole percentage point. In a joint article by Dmitry Kobak, Sergey Shpilkin and Maxim Pshenichnikov, an algorithm was proposed for estimating the probability of the formation of such outliers, based on simulating the distribution of turnout. Their algorithm generates a range of probable values not for the “true” turnout distribution, which was and remains unknown, but for the “Churov distribution,” based on the assumption that its sharp asymmetry may correspond to reality.
The analysis, which anyone can understand and reproduce, shows that the probability of such peaks appearing during natural stochastic processes is negligible. This method, with all its gentle approach to falsification, is sensitive enough to detect the anomalous nature of turnout even in relatively “clean” St. Petersburg (see Fig. 1, 2). This method allows you to reliably distinguish natural peaks caused by the presence of “popular” simple multiple ratios (½, 2/3, ¾, etc.) from anomalous peaks caused by the “human factor”.


Initial absolute indicators (for example, the number of valid ballots) also tend to be round numbers. Frequency analysis of the last digits also shows statistically significant deviations from the expected uniform distribution.
Do anomalies in election statistics prove fraud?
Yes. In the previous section I tried to explain why mathematical considerations are sufficient for this. However, they are not the only ones we have. Over the past years, reports from observers have accumulated about ballot stuffing and gross violations at the stage of counting votes, about discrepancies between the figures in the copies of protocols received by observers and the figures in the State Automated System “Elections”.
There are turnout recount data based on official video recordings, which significantly diverge from the data provided by precinct commissions (Fig. 3). This year, work with video recordings has just begun, but already the first results show in some areas registrations in the amount of one-third to two-thirds of the votes.

All these observable manipulations should leave digital traces. Ballot stuffing, “carousel” and similar technologies simultaneously increase turnout and the share of votes for the candidate-beneficiary of falsification, as a result of which the cloud of points on the scatter diagram in the turnout/vote share axes “spreads” along an arc upward and to the right, forming the tail of “Churov’s Comet” ”, accompanying the core of “honest” sites. Transferring votes from one candidate to another (without changing turnout) gives a second cloud of points above the main core.
The coordinated actions of falsifiers, focusing on a certain percentage (often non-circular) lead to the formation of stripe-like condensations of points in unexpected places, such as dozens of polling stations with the United Russia result of 62.2% in the Duma elections in Saratov in 2016 or 58% turnout in the gubernatorial elections elections in St. Petersburg in 2014.
The uncoordinated actions of thousands of falsifiers, who focus on whole or round percentages for ease of calculation, lead to the formation of characteristic peaks at integer values in the area of high turnout and high support for the leader (see Fig. 4). They are also responsible for the excessive frequencies of zeros in the last digits of the initial indicators (for example, the number of valid ballots). The “wall” in the distribution of turnout by 50% in 2004, when a quorum was still required, had the same nature.

Caution requires saying only that the presence of a digital trace of falsification indicates the need for verification. However, checks (for example, recounting the turnout using video) only confirm our cautious suspicions. Proponents of alternative hypotheses (spatial segregation by socio-economic parameters, coinciding with the boundaries of polling stations, the nature of “mobilization” of voters during the election campaign) cannot yet present any comparable results that would help explain the existing scale of anomalies.
Is it possible to assess the scale of falsification and restore the true picture of turnout?
The available estimates are approximate and, apparently, underestimate the scale of falsifications. This is due to the fact that the algorithms on which the calculations are based deliberately contain a number of assumptions “in favor” of the falsifiers. For example, the Monte Carlo model for simulating the turnout histogram proposed by Kobak, Pshenichnikov and Shpilkin includes the assumption that the turnout at the polling stations is really the same as in the data provided by the CEC (which, as we know, is obviously false).
The algorithm for calculating the excess of the expected share of votes is more subtle - it is based on the fact that when ballots are stuffed, simultaneously with an increase in turnout, the share of only one of the candidates should increase. In this case, firstly, manipulations in favor of other candidates (which also sometimes occur) are not taken into account. Secondly, it is insensitive to the “transfer” of votes from one candidate to another. Finally, it is not entirely clear how well this algorithm works in regions with completely or almost completely mapped data (due to the lack of a basis for comparison in the form of a pool of “fair” areas), and there are many such regions.
The tireless Sergei Shpilkin and other enthusiasts processed data down to the polling stations for all presidential elections since 2000, taking advantage of the moderate openness of the CEC. If we carefully analyze these data, eliminating all obvious anomalies, there remain only a few regions with a relatively stable reputation: Altai Territory, Arkhangelsk, Vladimir, Ivanovo, Kostroma, Magadan, Murmansk, Sakhalin, Sverdlovsk and Yaroslavl regions, Nenets Autonomous Okrug, Republic of Karelia and Khakassia .
A careful analysis shows that they are not free from anomalies (in particular, in the 2018 elections there was a slight anomaly in turnout around 70%), but compared to others they look decent. (There are about one and a half dozen regions in which in 2012 and 2018 the anomalies were very moderate, for example Moscow; however, the situation in previous years makes them unsuitable for longitudinal (long-term - Ed.) analysis.)
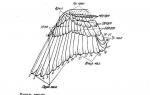
The turnout histogram constructed for these regions turns out exactly as I described above: slightly asymmetrical, with low “shoulders”, more peaked than a normal distribution with similar parameters (Fig. 5). It even has a 100% peak. There is reason to believe that in Russia as a whole everything should look approximately the same.

General note on the significance of identified anomalies
We often hear that the identified additions do not fundamentally change the outcome of the elections or that they are small, since the proportion of areas contributing, say, to anomalous peaks at whole percentage values, is negligible.
It seems to me that in both cases this is not the case. Peaks on the right “shoulder” of the turnout distribution indicate not isolated falsifications at specific percentages, but the fact that, apparently, all data in the area of turnout values exceeding 80% have almost nothing to do with the real expression of the will of voters.
The presence of large-scale falsifications, sometimes covering entire regions, should mean the cancellation of voting results in tens of thousands of polling stations, and possibly the recognition of the elections as a whole as invalid. The fact that this does not happen tells us a lot about the political system of modern Russia.
Last week two visitors wanted to know about summary entry of hours worked through report card in 1C ZUP 3. Let's look at this issue in more detail:
“Please help me set up a calculation in ZUP 3 that is similar to the calculation in ZUP 2.5. We previously introduced a time sheet with the “Summary, overall for the period” time entry method. How to do this in ZUP 3?
✅ Seminar “Lifehacks for 1C ZUP 3.1”
Analysis of 15 life hacks for accounting in 1C ZUP 3.1:
✅ CHECKLIST for checking payroll calculations in 1C ZUP 3.1
VIDEO - monthly self-check of accounting:
✅ Payroll calculation in 1C ZUP 3.1
Step-by-step instructions for beginners:
ZUP 3 also contains the document Timesheet, which can be used to enter the hours worked by employees. However, this document does not have the ability to summarize hours worked.
You can implement such input using the document. To do this in the directory "Templates for entering initial data" you need to create a new element. In it, on the “Types of time” tab, indicate the types of time for which we need to enter information. For example, let's indicate the time types Turnout and Night hours.
You must also check the " Overall for the period«.
As a result, in the document log "Data for salary calculation" A new document type will appear for entering hours worked. Let's enter the hours worked for employees Khristenko and Tsvetaev. Khristenko worked at night.

After this in the document "Calculation of salaries and contributions" for calculations for these employees, the data from the document will be used "Data for salary calculation".

To be the first to know about new publications, subscribe to my blog updates: